The Rat Fan Club
Plans for Cement Mixing Tray Cage
This cage made from vinyl-coated ½" square hardware cloth and a 2' X 3' plastic cement mixing tray, both purchased at Home Depot. A friend and I made this cage in about 3 ½ hours. It is light-weight, attractive, very easy to clean and the materials only cost about $35! The main advantage of this cage is that the wire sides of the cage do not sit in the bottom of the tray, but sit up on the edges of the tray. This keeps the wire sides cleaner. The disadvantage is that because the ends of the tray slope, the bottom isn’t as big as the top.
The hardware cloth comes in either white or green, and I recommend the green as it is easier to see through. It comes in rolls 5' long and either 2' or 3' feet high. We made our cage using the 2' rolls, and the total height of the cage is 30". Because the mesh is flexible I found it much easier to work with than plain hardware cloth. However, this means the door isn’t very stiff and needs 2-3 fasteners (depending on the skill of the occupants!) An option would be to make the door out of stiffer wire mesh, such as galvanized hardware cloth. While this cage isn’t as strong as those made out of heavy mesh (you wouldn’t want to sit on it!), I find it works well and seems strong enough. The tray is very strong and strengthens the whole cage. I have been using it for a while now and I have found that my rats have chewed off some of the vinyl coating, but most of it is still left.
I was going to put a photo of the cage here but for some reason it won’t show up. You can see it at www.ratfanclub.org/cages.html
Cage clips are a quick and easy way to put a cage together and can be purchased at feed stores. You’ll have to either buy or borrow a special tool to bend them around the wire. Have someone at the feed store show you how to use them. They don’t close tightly around the ½" square hardware cloth, but they work well enough. Because they fit loosely, you can also use them for the door hinges. (You can also use plain wire to fasten the cage together, but it will take longer. I highly recommend the cage clips.)
Materials
½" square vinyl-coated hardware cloth, 3 rolls
optional, piece of galvanized mesh for door
2' X 3' cement mixing tray
cage clips
14 gauge fence wire or a wire coat hanger
1-3 springs and 1" S-hooks for door fasteners
Tools
measuring tape
felt pen
wire cutters
2 needle-nose pliers
cage clip pliers (optional)
Step 1: For the walls you will use one full roll and one partial roll.
Unroll 2 rolls and lay them flat. Cut one of the rolls to a length of 47
½". A felt pen is helpful for marking where to cut. When doing the
cutting, cut flush to the edge of the piece, leaving the “tails” of
wire on the left over small piece. This small piece can be used a shelf if you
like.

Step 2: Lay out the full roll so the horizontal wires of the mesh are on
top. Measure over 32 ½" from the left end and cut a notch in the
bottom of the wire 2" up and 1" across as shown. The 32
½" should measure to the center of the notch. Bend the
“tails” of the wire over as shown. From the
center of this notch, measure over another 20 ½" and cut another
notch. Next, lay out the piece you cut in Step 1 so the horizontal wires
of the mesh are on top. Measure over 20 ½" from the right end and
cut another notch.

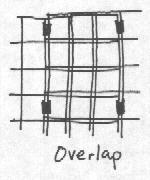
Step 3: Lay the two rolls end to end and overlap them 1 ½" as
shown. Fasten the 2 pieces together putting the cage clips about every 3"
on both sides of the overlap. (Note: practice putting the cage clips on a piece
of scrap mesh first!)
Step 4. Bend the bottom 2" of the mesh between
the notches up into a slightly curved 90 degree angle to form a lip as shown.
Then bend the walls at the center of each notch to form a corner. Fasten the
ends of the walls together with the cage clips to form the fourth corner.

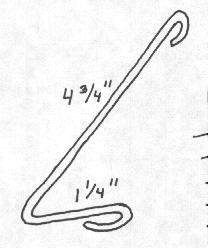
Step 5: Set the walls on top of the cement mixing tray. Mold the cage lip to
fit the lip of the tray. Make the 2 fasteners to join the cage to the tray by bending
the heavy wire as shown. The size of the fastener is critical, so be sure to
measure carefully. Hook the small loop on the wire mesh. The big loop should
slip tightly underneath the lip of the tray. If it doesn’t fit securely,
you need to adjust the fastener, or make another one that will. Once it fits
securely, bend the small loop closed to attach it to the cage.

Step 6: To make the top, unroll the last roll of mesh. Cut a piece 36"
long. Leave the “tails” on the remaining smaller piece which will
be the door, or if you are going to use different mesh for the door, you can
use it for a shelf. Before you put the top on, you should put in any shelves. I
recommend using an uncut edge of the mesh for the front of the shelf. In the
drawing of the finished cage, you'll see the front edge of the shelf is bent
down, however, on my cage I ended up bending it up instead to make a lip to
keep my rats from pushing food dishes off their shelf. Bending the front edge
of the shelf up ½" strengthens it. If you want the shelf to be
permanent, you can attach it with cage clips. If you might want to take it out
later, you can use the “tails” to fasten it to the cage. Put the
shelf in place with the “tails” poking through the mesh and bend them
down on the outside of the cage.

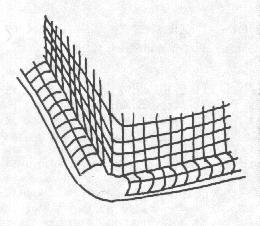
Step 7: To attach the top, first cut notches in each corner, 1 ½" X 2". Cut flush to the wire (do not leave “tails.”) Place the top on the cage and make sure it’s centered. Bend about 1 ½" on each side down over the side of the cage. Attach at both the top and bottom of the overlap with the cage clips, about every 3". (See drawing of finished cage below.)
Step 8: Decide how big you want the door. We made the opening for ours
11" wide and 12" tall and this seems to be big enough (a Senior Wodent Wheel will fit through but not a Wobust).
If you’ve put in a shelf, you may have move the door over slightly away
from the shelf. When cutting the opening for the door, cut it ½"
smaller on each side making sure to leave the “tails” of the wire.
Then bend these over to make a nice smooth finish to the door as shown.

Cut the door itself 1 ½" bigger than the opening on 3 sides for
overlap. Again, leave the tails on those 3 sides and bend them over to make a
nice edge. Attach the side of the door without the “tails” bent
over to the cage with cage clips as hinges. To make the door fasteners put one
end of the spring onto one loop of the S-hook and with the pliers, bend the
loop closed. This will take a fair amount of strength. Attach the other end of
the spring to the cage.

News | Rat Info | Adopt a Rat | Rat Books
Reviews | Merchandise | Special Events
Meet the Ratlady
| Links | Home
Rat Fan Club
Copyright 1999