The Rat Fan Club
Plans for a Wire Cage
Making this cage requires some dexterity and strength. The most tedious part is filing the edges to remove sharp points. The hardest part is bending the walls to make them fit well inside the pan.
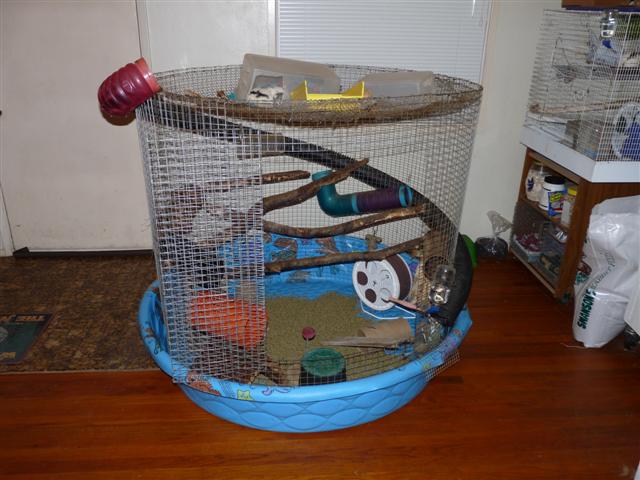
There are a variety of products that can be used as the pan for a rat cage. It's best if the pan is at least 2" high, and 3-4" is better, to prevent litter from being kicked out of the cage. The bottoms of some of the new large plastic storage containers can work well. You can order plastic pans from Stewart Sales at 800-452-9340. A pan 24" X 30" is only $10. The only drawback is that the pans are not quite 2" tall. You can also have pans custom made at a metal shop (ask them to roll the edges--they'll know what this means). I suggest a rectangular cage be at least 15" X 30" X 14" high. This height will provide space for a wheel and/or various hanging toys.
You can use either 1/2" square hardware cloth or 1" square mesh to make this cage. You must use the smaller mesh if you plan to house baby rats in the cage, but the 1" mesh is fine for adults. DO NOT use 1" X ½" mesh for raised floors, as it can trap a rat’s foot. Shelves must be made of ½" or ¼" square mesh. Cage clips are an easy way to put a cage together and can be purchased at hardware stores. Have someone at the hardware store show you how to use them. However, you have to either buy or borrow a special tool to bend them around the wire. Cage clips do not close tightly around the 1/2" square hardware cloth, but still work, and because they don't close tightly can also be used for door hinges. Please read all the instructions before buying any materials, and inspect any hardware cloth before buying to make sure it's straight and regular.
Materials
pre-made pan
½" square hardware cloth or 1" square mesh
cage clips (optional) or 22 gauge wire
14 gauge fence wire, a wire coat hanger, or 1" S-hooks for fasteners
1-3 springs
Tools
measuring tape
felt pen
work gloves
wire cutters
metal file
needle-nose pliers
cage clip pliers (optional)
drill or large nail and hammer
Step 1: You will be cutting 3 pieces of wire mesh for the cage: the walls,
the top, and the door. As an additional option, you can also make a shelf.
I’ve included sample cutting patterns for each piece. The amount of mesh
you need to buy will depend on the size of your cage, and this will depend on
the size of your pan. Measure the inside circumference of the pan down at the
bottom where the walls will rest. This will be how long you need to cut the
piece for the walls. The door will form part of the top of the cage, so the
length of the top will be 8" shorter than the rectangle formed by the
walls. The shelf will be the width of the cage, and about 8" long. Add
1" to bend down (or up) to strengthen the shelf.
Step 2: Cut the walls and put them together first, so you can refer to them to measure the top, door, and shelf. You must file all the edges of the mesh so there are no sharp points. It’s easier to file the edges of the walls made from hardware cloth after it has been bent and wired into a box, but be careful when bending it so you don't get scratched.
Step 3: Measure the walls and mark where they need to be bent. Try to bend the corners to fit the pan. Some pans will have sharp corners and some will have rounded corners. To help bend the mesh, lay a board across it, stand on the board and bend the wire around it.
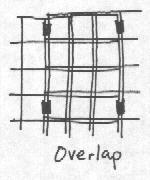
Step 4: Fasten the final edge of the walls together with either wire or cage
clips. If using the wire, cut each piece 1
¼" long. Wrap several times around the adjacent wires to form a
fastener, then bend the ends of the wire inside the
wrappings so they don't stick out. Put a fastener about every 3". You will
use the same technique to join all the pieces.
Step 5: If you want a shelf in the cage, measure and cut it, and be sure you
file the edges very well. You will want to bend the front edge of the shelf
either up or down as shown to strengthen it. Bending it up will make a lip that
will keep items such as food dishes on the shelf. Using either the cage clips
or wire, fasten the shelf to one end of the cage halfway up the wall.

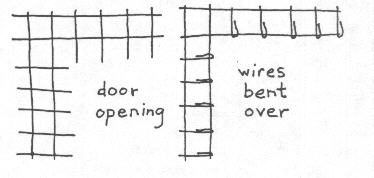
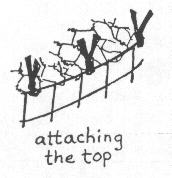
Step 6: Measure and cut the top and fasten it onto the end of the cage above
the shelf. Measure and cut the door, then bend the
three edges down as shown and make sure there are no sharp edges. Fasten the
door to the top with 4 loose cage clips to act as hinges. You can also make
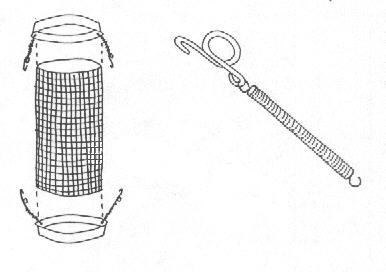
hinges with loose circles of heavy wire. A spring will be used to fasten the
door closed. On one end of the spring you will put a fastener, either a 1"
S-hook or a fastener you make out of the heavy gauge wire as shown. With
pliers, squeeze one side of the S-hook together to attach it to the spring.
This takes a fair amount of strength. Fasten the other end of the spring to the
center edge of the door. To fasten the door, pull the fastener down and hook it
on one of the cage wires.
Step 7: Drill or punch a 1/8" hole in the center of each end of the pan near the rim so the cage can be fastened to it. If the pan is metal, be sure to file the edges of the hole. If you have the pan custom-made, the shop can do the holes for you.
Step 8: There are two ways to fasten the cage to the pan. For lighter plastic pans, you can use strong spring fasteners like that used to close the door. Attach one end of the spring to the pan with heavy gauge wire, and the other to a wire fastener.
For heavier metal pans, you should use more secure wire hooks. To make the wire hook fasteners, measure the distance from the hole
in the pan about 2 ½" up to the nearest wire on the cage.
This is the length to make the shaft of the hook. Bend it as shown. Insert the
rounded end through the pan hole and squeeze it closed. To fasten the hook,
push the end through the wire. If it won't go, you need to make another hook a
little longer. It doesn't have to fit really tight, just enough to hold it in
place.
Note: Although it's not imperative that the pan be fastened to the cage,
it’s safer if it is. Not only will this protect your rat from other
animals if the cage falls, but in case of a fire, you—or a
fireman—would be able to grab the cage in a hurry without the bottom
falling off.
News | Rat Info | Adopt a Rat | Rat Books
Reviews | Merchandise | Special Events
Meet the Ratlady
| Links | Home
Rat Fan Club
Copyright 1999