The Rat Fan Club
Plans for Round Cages
You can make a giant cage using a 4' wide kid’s wading pool as the bottom, or a slightly smaller cage using a smaller wading pool. You can make also make an even smaller cage using a metal hot water heater pan or a plastic plant saucer for the bottom. If you use the plant saucer, you can also use one to form the top of the cage too. When I made my giant cage in 2002 years ago, the materials cost me $45. When choosing a kid’s wading pool, try to find one with a minimum of bumps on the bottom. Unfortunately, all the ones I've seen have fish with sunken eyes, which makes them a little harder to clean. However, the pool is still pretty easy to clean if I take it outside and use the hose, once I have scooped out all the litter. Keep in mind that the giant cage itself is too big to fit through most doors unless you partially collapse it. Make it in the room you want to keep it in!
I have added a sewer pipe tube running from the lip of the pool up around the cage to the top. This has been super popular with my rats, who prefer to spend most of their time on the top of the cage, which I have furnished with a large plastic igloo and a litter box. They can only access the tube if the cage door is open, therefore, the only rats I allow to live in this cage are those who don’t care to jump out of the cage onto the floor. Most of my rats won’t, so I can also use this cage as a playground.

Cage clips are a quick and easy way to put a cage together and can be purchased at feed stores. You’ll have to either buy or borrow a special tool to bend them around the wire. Have someone at the feed store show you how to use them. They don’t close tightly around ½" square hardware cloth, but they work well enough. Because they fit loosely, you can also use them for the door hinges. (You can also use plain wire to fasten the cage together, but it will take longer. I highly recommend the cage clips.)
Materials
½" square hardware cloth or 1" square mesh
round bottom
cage clips (optional) or 22 gauge wire
½" aviary mesh, 4' wide (for giant cage)
2 snap clips (for giant cage)
for smaller cage, 14 gauge fence wire, a wire coat hanger, or 1" S-hooks
for fasteners
3-6 springs for smaller cage
twisty ties for giant cage (optional)
Tools
measuring tape
felt pen
work gloves
wire cutters
metal file
needle-nose pliers
cage clip pliers (optional)
drill and small drill bit (for smaller cage)
Step 1: Decide how tall you want to cage to be. The giant cage can be 4 to 6' tall depending on the wire mesh available. You don't want to make a smaller cage too tall or it will be top heavy. The cage should be about the same height as its diameter. To determine the length of wire mesh you'll need for the cage, measure the diameter of the cage bottom at the inside bottom, where the cage walls will rest. Divide the diameter in half and multiply by 6.28. For the giant cage, add 12" extra for overlap. For the smaller wading pool add 6" overlap, for the smaller cages add 2" overlap if you are using 1/2" square mesh, and 4" overlap if you're using 1" square mesh. I recommend using 1" square mesh for the larger cages.
Step 2: When you measure the wire mesh it helps to mark it with a felt pen.
When cutting the right length of wire mesh for your cage, cut the wires flush
to the vertical wires. File the cut edges to eliminate any sharp points. If you
need to cut the height of the mesh too, you'll need to file these cut edges
too. (It's a lot easier to buy a roll of mesh the height you want for the
cage!) Roll the cut piece into a circle to form the walls of the cage. Place
the piece inside the cage bottom and spread it out as wide as possible. Where
the edges overlap, fasten them together with either cage clips or 22 gauge
wire.

Step 3: The larger cages are heavy enough that you do not need to fasten
them to their wading pool. For the smaller cages, fasteners using strong
springs are a good idea. You will need to drill a small hole on either side of
the pan to which you will attach the springs. For fasteners you can either use
1" S-hooks or make fasteners out of the heavy gauge wire as shown. With
pliers, squeeze one side of the S-hook together to attach it to the spring.
This takes a fair amount of strength.
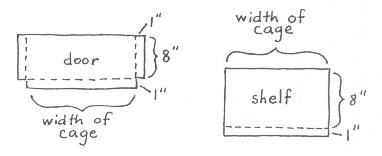
Step 4. Measure the opening for the door. If you want to be able to get inside the giant cage, the door must be at least 24-28" wide. The door opening should be at least 4" below the top of the cage (for strength) and 2" above the rim of the bottom (for clearance). The overlap is the strongest part of the cage, so it's best to have the door hinges about 2" from the overlap. Important: When cutting the opening for the door, leave the "tails" of the wire so you can bend them over. This will form a nice smooth opening for the doorway. Bend the "tails" to the inside of the door opening. Since the door will open outward, this will prevent the door from catching on them.
In the second version, I made the door hinged in the middle so when it was
in the open position, it could fold back so it didn’t stick out so far.

Step 5: Cut the door itself 3" taller and 2" wider than the door opening for overlap. You can either leave the tails on the cut edges of the door and bend them over, or cut them flush and file the sharp points. On the edge of the door where it will be hinged, it's best to cut them flush. If you bend the tails over, bend them to the outside of the door so they won't catch on the edges of the door opening. Bend the door so it matches the arc of the caged. Attach the door to the cage with cage clips as hinges, or make wire hinges. Be sure to center it from top to bottom.
Step 6: For the large cages the most secure door fasteners are snap clips (like at the end of a dog leash). You'll need 2, one for the top and one for the bottom of the door. For a smaller cage you can use the same type of fasteners that you use to secure the cage to the bottom, however, choose more flexible springs. Depending on the size of the door and the type of mesh, you may need one or 2 fasteners.
Step 7: For the larger cages, it's best to make the top out of aviary mesh,
which is lighter than hardware cloth. Lay the piece of aviary mesh across the
cage, centering it. With twisty ties, anchor the mesh at 4 points around the
cage. Cut the already cut edges of the mesh about 1-1 1/2" larger than the
cage all around. Bend the mesh flat to itself so the folded edge hangs over the
edge of the cage slightly. Fasten the mesh to the cage with either 22 gauge
wire or twisty ties cut in half. Weave the wire around the edge or put twisty
ties every 1 1/2-2".

For a smaller cage, you can make the top out of the same mesh as the cage,
although it's difficult to cut other type mesh to form a circle. You can also
use the same pan you use under the cage as a top, fastening it to the cage in
the same way.

News | Rat Info | Adopt a Rat | Rat Books
Reviews | Merchandise | Special Events
Meet the Ratlady
| Links | Home
Rat Fan Club
Copyright 1999-2013